|
|
Leica 送给客户的建议,摄员们可以读一下。
| CARE AND PROTECTION FOR YOUR CAMERA SENSOR | | How to avoid dust and clean your sensor | | Even if you take the greatest care when changing lenses, it is not possible to completely prevent small amounts of dust and dirt from entering the camera body and landing on the sensor. Dust gathers on body caps and the rear caps of lenses and the finest particles are produced everywhere where moving parts are used - for instance, by friction between the bayonet and the lens mount, or even from the action of the mechanical shutter that controls the exposure. With the aid of a couple of practical tips, the number of particles of dust additionally reaching the sensor can be considerably reduced. |
CARE AND PREVENTION
| How to protect your sensor
| • | Before mounting a lens, carefully clean all parts of the lens that come into contact with the camera. | • | Always put the rear lens cap back on the lens after use. | • | Clean the body cap before use. | • | Always store all caps in a clean and dust-free place when not in use. Tip: Connect the rear lens cap that is currently not in use to the camera body cap. | • | When changing lenses, always hold the camera with the bayonet pointing downwards. | • | Avoid changing lenses in dusty environments. If this should not be possible, change the lens inside a large and clean plastic bag.
| • | Always change the lens as quickly as possible.
| • | Make sure that no wind blows into the open camera. Always hold your camera with your back to the wind. |
|
| | CARE AND PROTECTION FOR YOUR CAMERA SENSOR | | How to avoid dust and clean your sensor | | Even if you take the greatest care when changing lenses, it is not possible to completely prevent small amounts of dust and dirt from entering the camera body and landing on the sensor. Dust gathers on body caps and the rear caps of lenses and the finest particles are produced everywhere where moving parts are used - for instance, by friction between the bayonet and the lens mount, or even from the action of the mechanical shutter that controls the exposure. With the aid of a couple of practical tips, the number of particles of dust additionally reaching the sensor can be considerably reduced. | [table]
| [table]
|

|
| |
|
|

|
[/td][/tr]
[/table][/td][/tr]
[tr][td] | CARE AND PREVENTION
| How to protect your sensor
| | • | Before mounting a lens, carefully clean all parts of the lens that come into contact with the camera. | • | Always put the rear lens cap back on the lens after use. | • | Clean the body cap before use. | • | Always store all caps in a clean and dust-free place when not in use. Tip: Connect the rear lens cap that is currently not in use to the camera body cap. | • | When changing lenses, always hold the camera with the bayonet pointing downwards. | • | Avoid changing lenses in dusty environments. If this should not be possible, change the lens inside a large and clean plastic bag.
| • | Always change the lens as quickly as possible.
| • | Make sure that no wind blows into the open camera. Always hold your camera with your back to the wind. |
|
|

|
|
[/td][/tr]
[tr][td] | MICROFINE PARTICLES
| Minimal effects
| | It is almost impossible to completely remove every trace of dirt or dust from a sensor. But at least you can minimise the effects of particles if you observe the following rules: | | | • | Unless absolutely necessary, avoid the use of small apertures. With apertures ranging from f/8 to f/22, for example, particles are rendered sharply by the sensor and become more noticeable in pictures. In contrast, shooting wide open often makes them disappear completely. By the way, as this avoids the diffraction effects associated with small apertures, the results will generally also be better. | | • | It is better not to stop down any further than f/4, particularly when capturing subjects with homogeneous areas, for example large expanses of sky. | | • | Should spots nevertheless be found on pictures, these can be removed with the spot removal tool in Adobe Lightroom. This can be done on both DNG and JPG files. As spots from dirt on sensors are always at the same location in pictures, this tool can be used for batches of images by selecting 'Copy and paste settings' from the drop-down menu in 'Develop' mode. |
|
|
|
[/td][/tr]
[/table]
CORRECT CLEANING
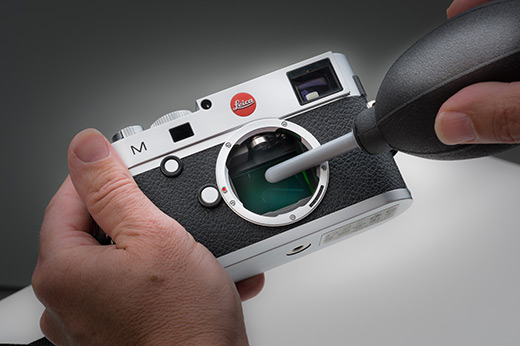
| | The dos and don'ts of sensor cleaning | Never try to remove particles from sensors without appropriate aids, for instance by blowing into the camera. All good camera dealers stock a range of different products for sensor cleaning. Please remember that camera sensors are extremely sensitive and very easy to damage. Damage caused by incorrect manual sensor cleaning may well lead to elaborate and very expense repairs.
For this reason in particular, we recommend cleaning methods without brushes and without touching the sensor. For example, loose particles of dust or dirt can be easily removed from the glass cover of the sensor with a (rubber) blower or with clean, or even ionised, pressurised inert gases like nitrogen. If the camera sensor is very dirty and cannot be cleaned without direct contact, we recommend professional sensor cleaning by an authorised Leica Service workshop. You can arrange to have this done by contacting Leica Customer Care. |

|
|